Generic ERP/CRM Interface
- Thorsten Boedeker
This documentation is intended to be the basis for ERP/CRM integration projects into symmedia Hub. The symmedia Hub offers a standard graphQL interface that can be used to integrate third party systems.
Therefore, we start with a tutorial on how ERP systems can authenticate to our API Gateway and then explain, which queries and mutations are available to gather and pull data from the primary system.
To identify objects like customers, machines, service cases… in both systems (symmedia Hub and SAP), the symmedia Hub provides an external ID field for each object. This can be filled with corresponding unique identifiers from the SAP- / ERP system.
Authentication
All symmedia Hub API queries and mutations require dual authentication using a valid API Key and a valid token. You need to include both in the HTTP headers of your requests.
How to Obtain an API Key from symmedia?
To obtain an API key from symmedia, follow these steps:
Contact symmedia: Reach out to symmedia through their official website, support email, or support hotline to request an API key.
Submit your request: Explain your purpose or the type of integration you plan to undertake with the API key. This helps symmedia provide you with the appropriate key and instructions.
Receive documentation and instructions: symmedia will likely provide specific instructions on how to use the API key for authentication. Ensure that you carefully read and follow these instructions.
Prioritize security: Treat the API key with care and store it securely, as it grants access to systems and data. Adhere to best security practices to protect your API key.
Integrate: Once you have the API key and have followed the provided instructions, you can proceed with integrating it into your systems and utilize the symmedia API as needed.
This API key has a long term validity and is valid for this use case only.
Using an Application Authorization Token (JWT) to authenticate
To authenticate applications programmatically (without the need for 2FA) we are using the OAuth 2.0 Client Credentials Flow. The application and our authorization server need to share a secret/certificate, which will be generated by the symmedia Hub platform when adding a new application in the portal.
The authenticating application needs to get an authorization token (in the form of a JWT) from the authorization server, which can then be used to call our GraphQL API. You can get an authorization token at these endpoints, depending on witch instance your tenant is running:
Prod: https://symcloudplatformb2cprod.b2clogin.com/symcloudplatformb2cprod.onmicrosoft.com/B2C_1A_SIGNIN/oauth2/v2.0/token
Staging: https://symcloudplatformb2cstaging.b2clogin.com/symcloudplatformb2cstaging.onmicrosoft.com/B2C_1A_SIGNIN/oauth2/v2.0/token
The authorization token needs to be renewed periodically, which is done automatically by most OAuth2.0 clients. The default lifetime of an authorization token is 60-90 minutes.
Make sure to guard these tokens well, as they can be used to impersonate your application (as long as the token is valid and its lifetime is not exceeded). This also applies to the shared secret/certificate, as they can be used to get unlimited new authorization tokens from the authorization server.
Querying and sending master data
Service Organizations
Since service organizations in symmedia Hub are associated with permissions, it is recommended to create them manually.
As of today, this object is missing the External ID. However, it will be added by symmedia if required.
The available Service Organizations can be determined with the following query:
{
  serviceOrganisationsPaginated {
    data {
      id
      name
      description
    }
  }
}
Customers
In order to support the creation and invitation of customers well, address data is recorded in addition to the customer name. The addresses are optional, but increase the confidence in the data, if, for example, the correct address is already displayed in an invitation to the customer.
In addition to the name, it is also mandatory to specify the service organization.
Query all customers
The query to get all existing customers is:
{
    customersPaginated {
        data {
            id
            name
            status
            externalId
            serviceOrganisation {
                id
                name
                description
            }
            address {
                country
                state
                city
                postalCode
                street
                street2
            }
        }
    }
}
Query a specific Customer via ExternalID
{
    customer(externalId: "Unique Customer ID from SAP/ERP") {
        id
        name
        status
        externalId
        serviceOrganisation {
            id
            name
            description
        }
        address {
            country
            state
            city
            postalCode
            street
            street2
        }
    }
}
Create a Customer
In order to create a not existing customer, the following mutation can be used:
mutation CreateCustomer {
    createCustomer(
        customer: {
          name: "Name of the Customer"
          externalId: "Unique Customer ID from SAP/ERP"
          serviceOrganisation: "ID of Service Org"
          address: {country: "DE"}
          }
    ) {
        id
        name
        status
        externalId
    }
}
The country is mandatory and is following the ISO 3166-1 alpha-2 norm. Optionally, further address data can be provided as well. The result can contain all fields, available in the customer query above. The name and the “ID of Service Org” are mandatory and the second one needs to be a valid Id from a Service Organization (see above, how to query them)
Update a Customer via ExternalID
It is possible to change the name, the Service Organisation or the address data of any customer by using the following mutation and the respective externalId:
mutation {
  updateCustomer(
    customer: {
      externalId: "Unique Customer ID from SAP/ERP"
      name: "Name of Customer"
      serviceOrganisation: "ID of Service Org"
      address: {country: "DE"}
    }
  ) {
    id
    externalId
    name
    status
  }
}
The country is mandatory and is following the ISO 3166-1 alpha-2 norm.
Machine Models
It is necessary to use a machine model in order to create a customer machine. Therefor we need to query the machine models as well:
{
  machineModelsPaginated {
        data {
            id
            modelName
            technology
            brand
            externalId
        }
    }
}
Although we recommend creating the machine models manually, this can also be done using the following mutation:
mutation {
    createMachineModel(
        machineModel: {modelName: "Model Name"
        technology: "Technology"
        brand: "Brand"
        externalId: "Unique SAP ID - Material no"}
    ) {
        id
    }
}
Customer Machine
Now we have all necessary ingredients to create a customer machine via API. To receive a complete list of all existing machines, we can use the following query:
{
    customerMachinesPaginated {
        data {
            id
            serialNumber
            displayName
            externalId
            isSp1Migration
            edgeDeviceSerialNumber
            machineModel {
                id
                modelName
                technology
                brand
                externalId
            }
            customer {
                id
                name
                externalId
            }
        }
    }
}
To create a Customer Machine it is now possible to use the following mutation:
mutation {
    createCustomerMachine(
        customerMachine: {
          customer: {customerExternalId: "Unique Customer ID from SAP/ERP"},
          serialNumber: "Serial Number of the Machine",
          machineModel: {machineModelExternalId: "Unique SAP Machine Model ID - Material no"},
          externalId: "Unique SAP ID of the Machine",
          edgeDeviceSerialNumber: "if not available, it can be removed",
          isSp1Migration: true}
    ) {
        id
        serialNumber
        externalId
        status
        isSp1Migration
        edgeDeviceSerialNumber
    }
}
//alt!!!!
------------

mutation {
  createCustomerMachine(
    machineModel: {machineModelExternalId: "Unique SAP Machine Model ID - Material no"}
    customer: {customerExternalId: "Unique Customer ID from SAP/ERP"}
    externalId: "Unique SAP ID"
    serialNumber: "Serial Number"
    edgeDeviceSerialNumber: "if not available, it can be removed"
    isSp1Migration: true
  ) {
    id
    externalId
    serialNumber
    status
    edgeDeviceSerialNumber
    isSp1Migration
  }
}
Querying Service Cases and update Service Case Content
To get a full list of Service Cases the following query can be used:
{
  serviceCasesPaginated(options: {view: SERVICE_PROVIDER}) {
    data {
      id
      displayId
      externalId
      title
      description
      priority
      severity
      createdAt
      updatedAt
      closedAt
      state {
        name
      }
      creator {
        name
      }
      assignee {
        name
      }
      customerMachine {
        id
        externalId
        serialNumber
      }
      customFields {
        key
        value
      }
      closingReport {
        isSolved
        notes
      }
    }
  }
}
When a Notification in SAP has to be linked to an existing Service Case. The creation of notifications is not clear. The current workaround would be, to get all Service Cases and to identify new ones, to create SAP Notifications for them and to send the following update for the respective Service Case:
mutation {
  updateServiceCaseExternalId(
    serviceCaseId: "SCID"
    externalId: "External ID from SAP/ERP"
  ) {
    id
    externalId
    displayId
  }
}
Important Remark
This manual is based on the first version of the symmedia Hub Public API. Even so we do our best to keep the API free of breaking changes, they might occur in the future. Breaking changes will be announced upfront and there will always we a transition time of at least 6 months.
Hands on the API with Postman (to get a feeling for the usage)
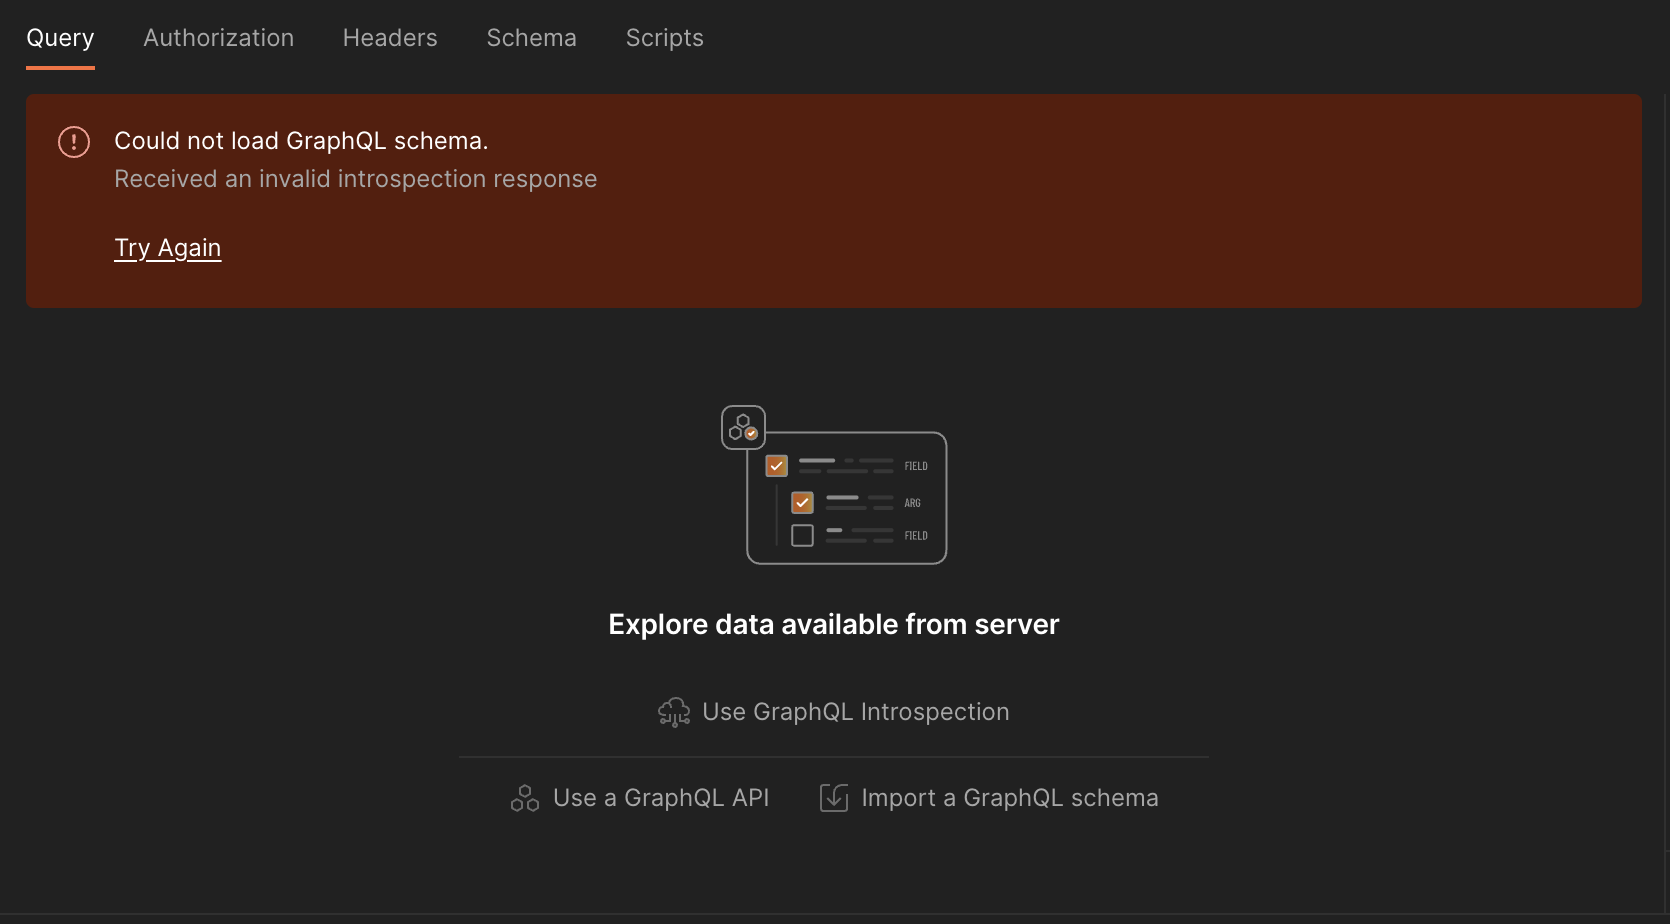
Some people might not be familiar with GraphQL. The below description is showing, how to use postman (download at https://www.postman.com/downloads/) to query some data via the API. The queries from above can be used, but all line-breaks and newlines need to be removed. If you are not familiar with postman, check out their learning center at https://learning.postman.com/docs/sending-requests/graphql/graphql-overview/
The screenshots are taken in postman 10.17.2.
The screenshots are taken using our Staging environment, the URL of the public API for Staging is https://api-staging.secure-service-hub.com/graphql
If your tenant is onboarded on the productive environment, the endpoint is https://api.secure-service-hub.com/graphql
Authorization
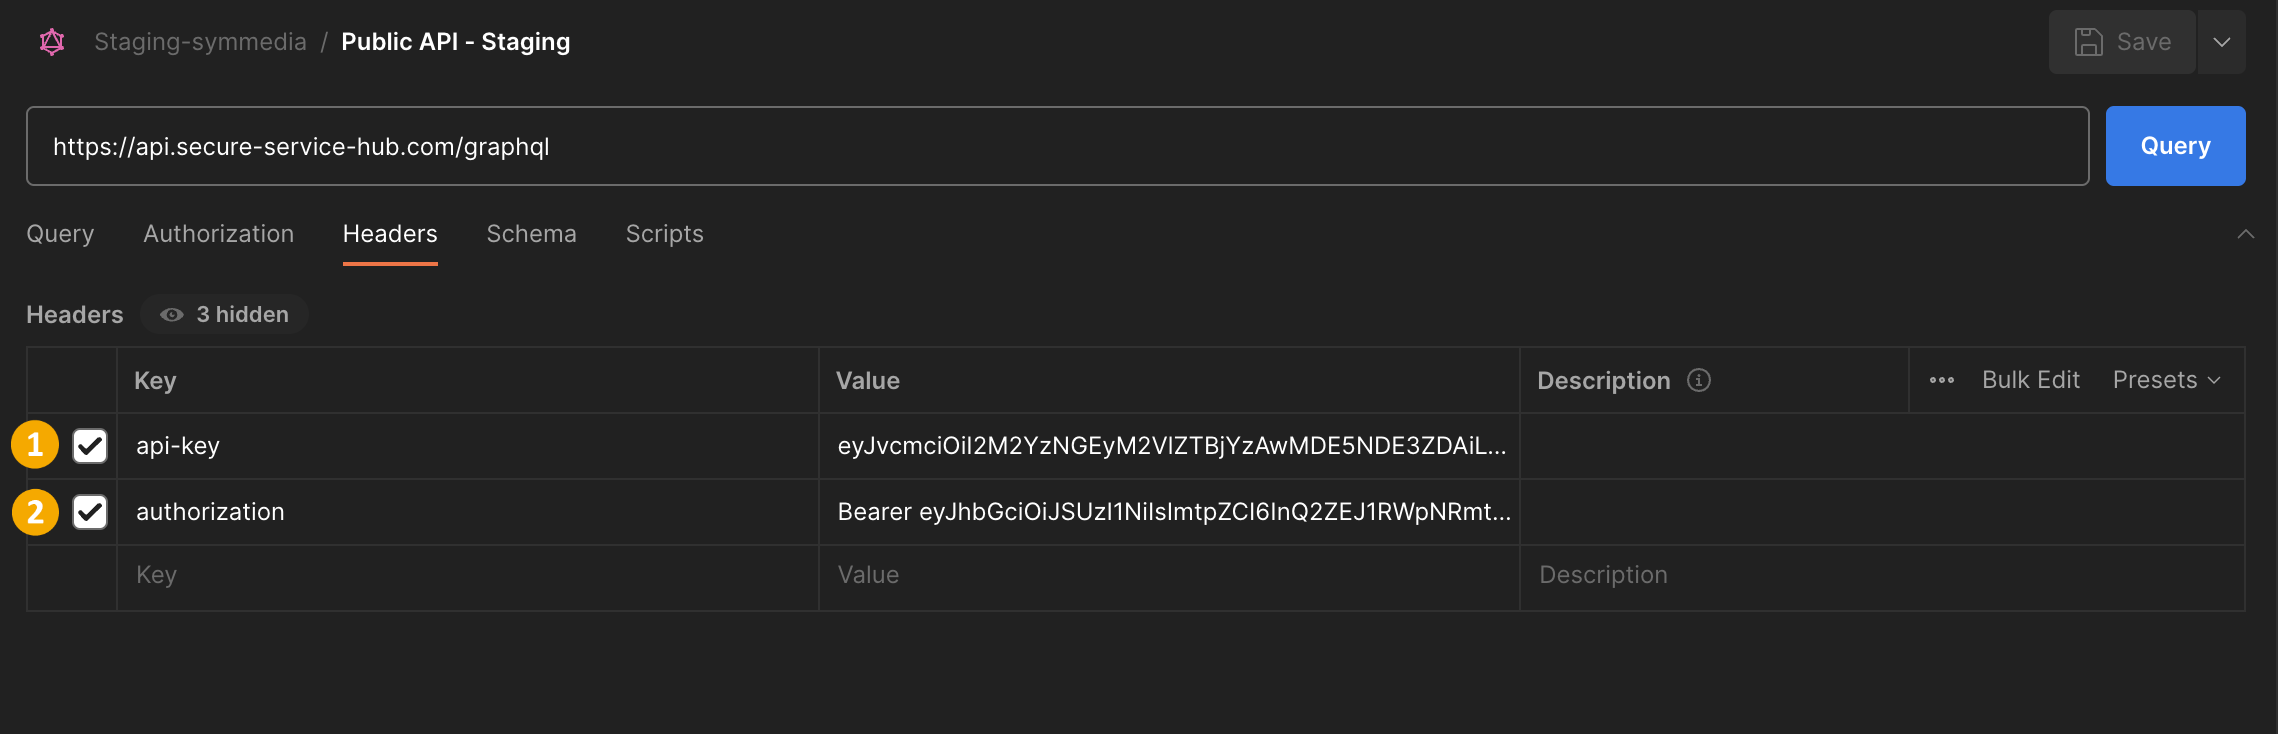
- Select graphQL as client.
- Enter URL of public API.
- Click on
 .
. - Click on
 .
.
Key | Value | comment | |
|---|---|---|---|
| api-key | {Your companies API-key} | The key has been provided by your symmedia contact person. |
| authorization | Bearer {your personal bearer token} |
|
Setting up a Query
- Click on
 .
. - Click
 .
.
A list with all public queries and mutations is displayed:
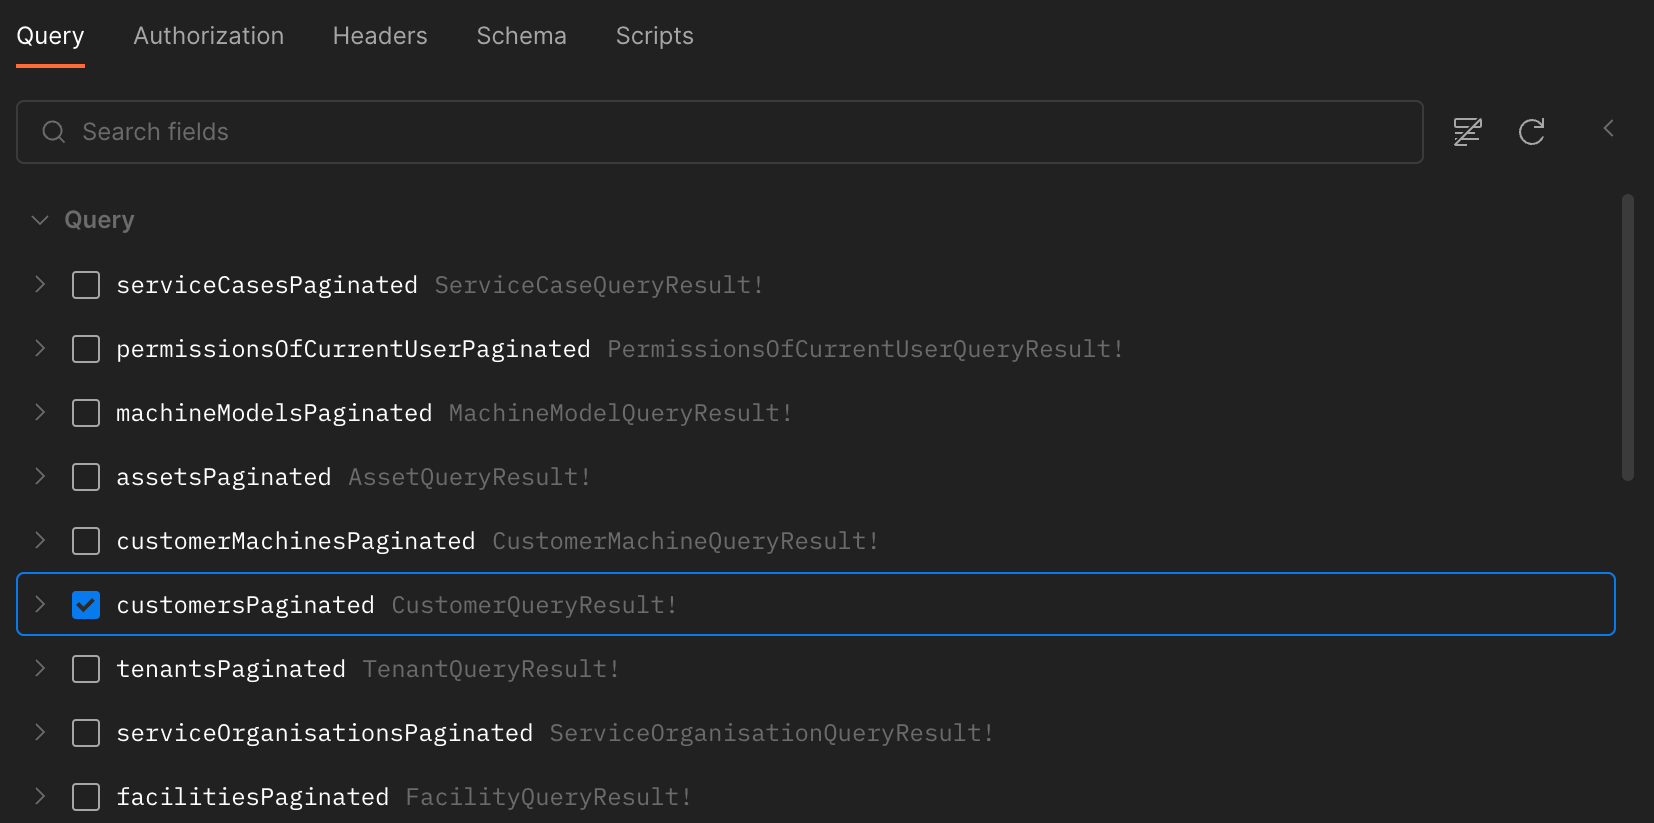
Select a query (e.g. customersPaginated) and select the fields you would like to see.
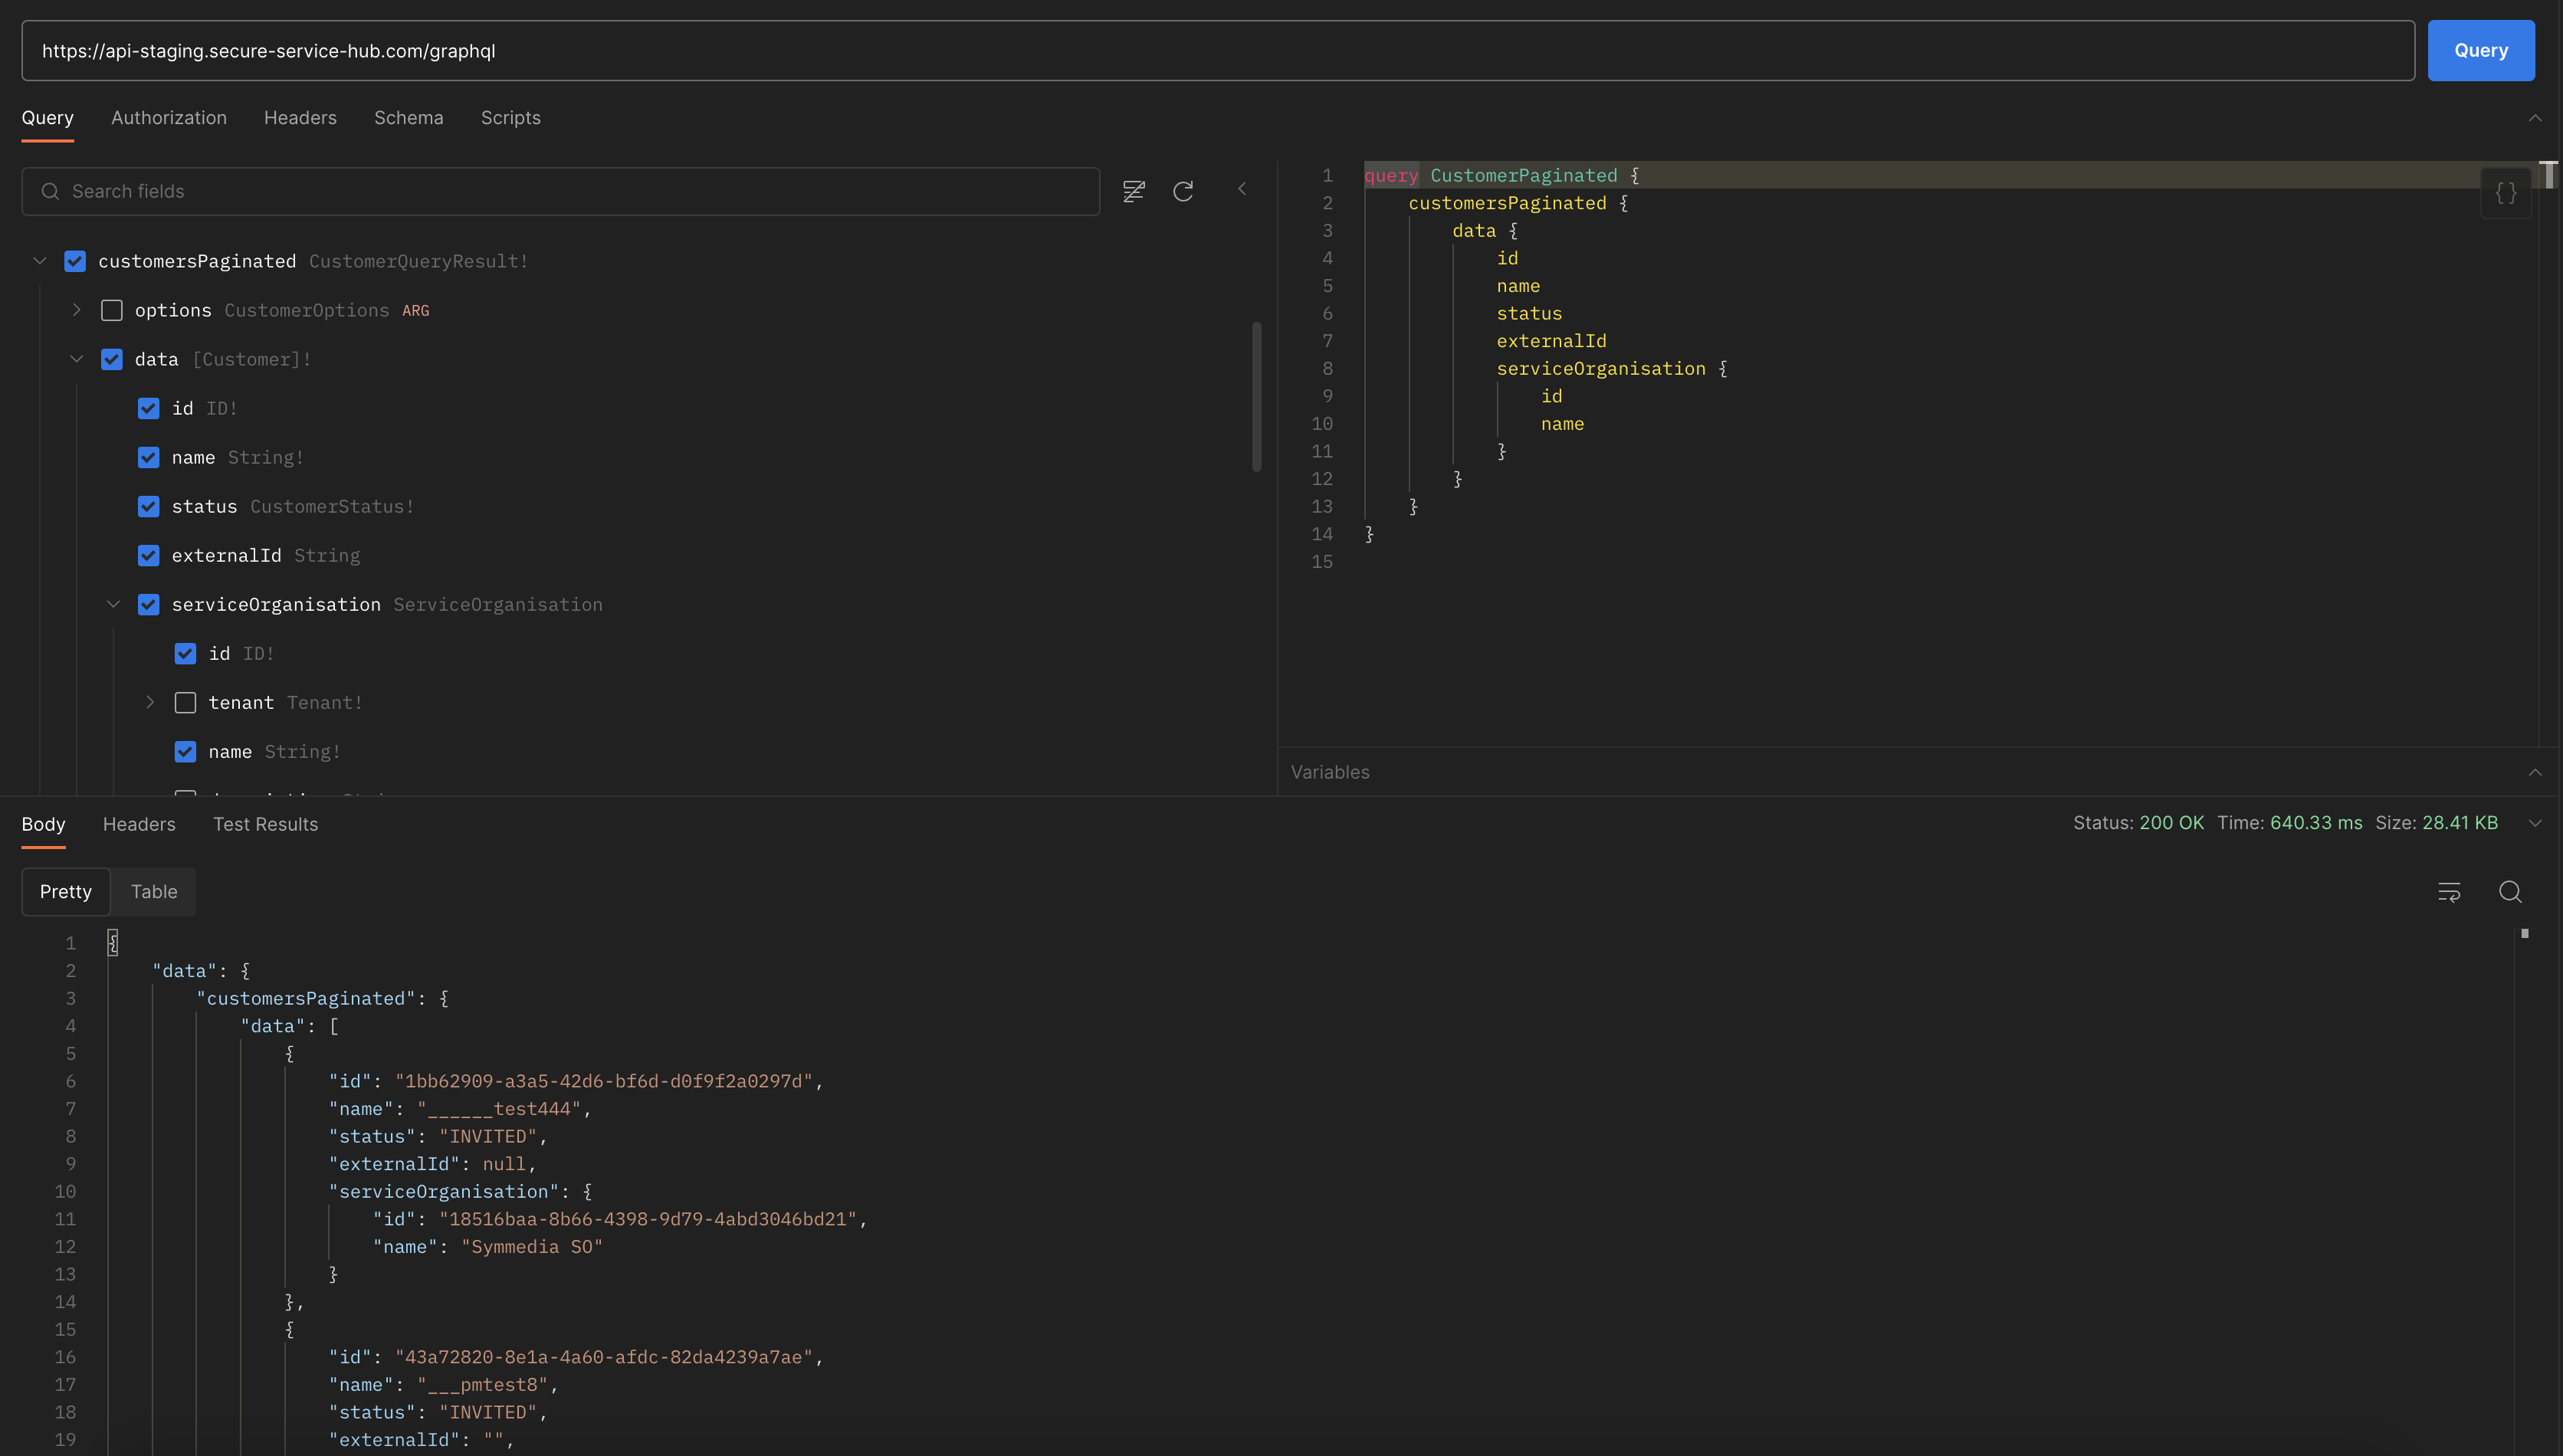
Click on the
 button. The result is displayed on the bottom of the page.
Click on
 to display the result in a table view.
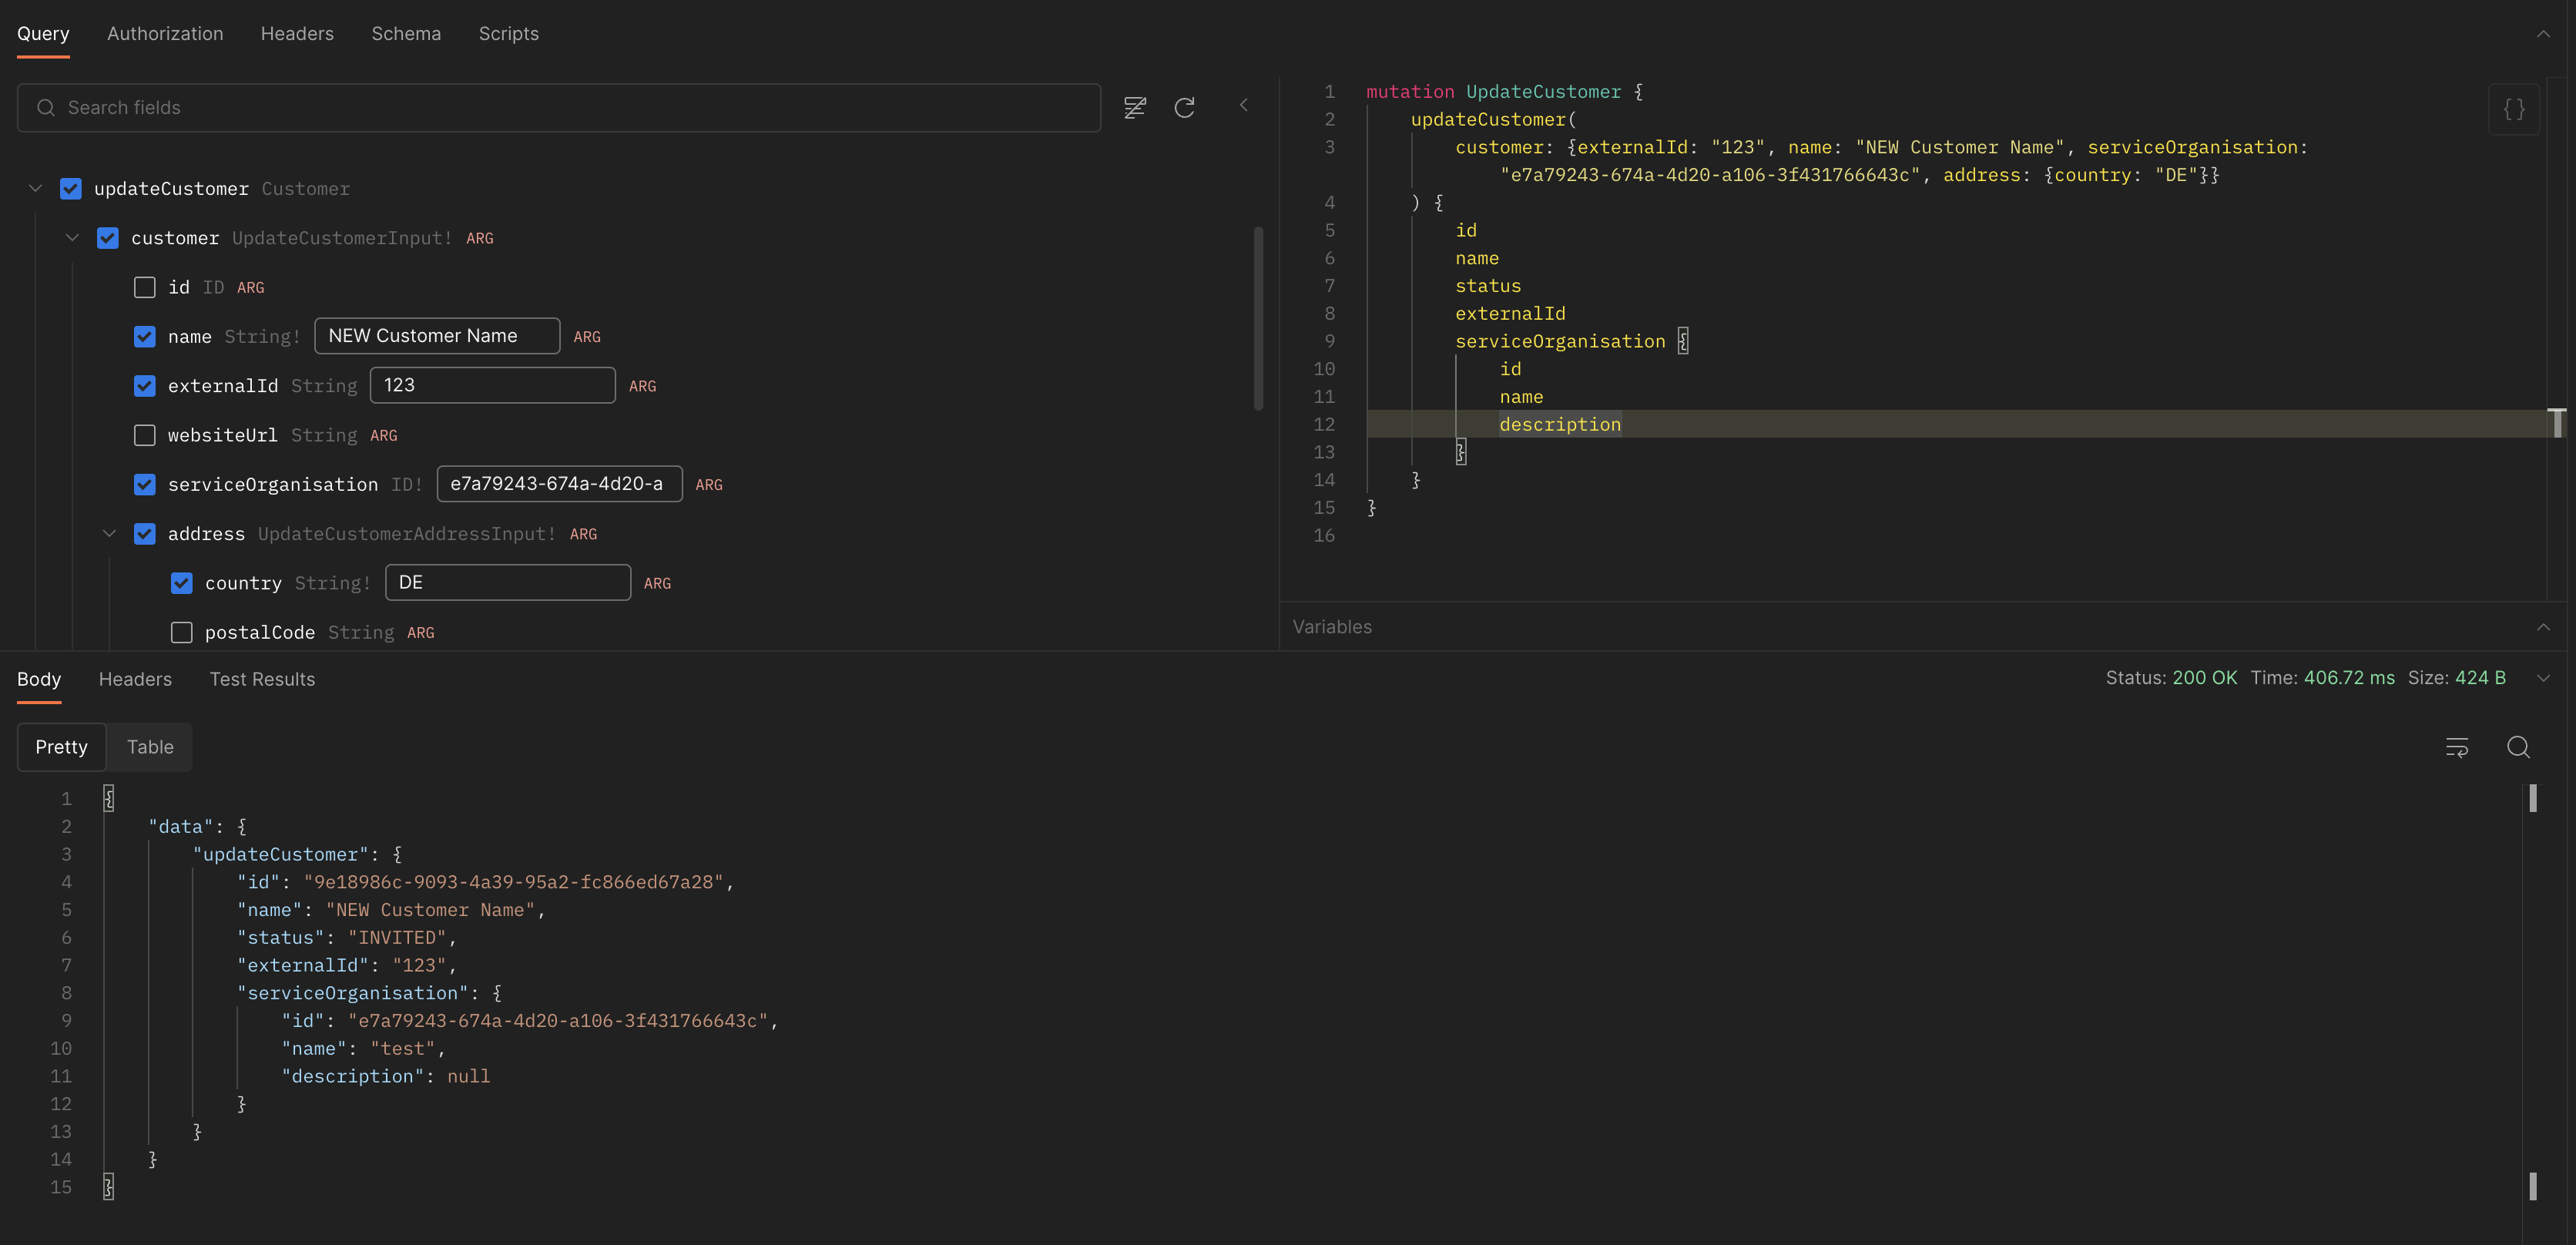
Setting up a mutation
As an example we use the update customer mutation.
Select the externalID of the customer and the corresponding serviceOrganisationID of the result of the query above.
Select the Mutation updateCustomer and paste the externalID, serviceOrganisationID and the country code.
In this example, the customer name is changed to “NEW Customer Name”.